Python, TypeScript and ComfyUI: our three clients
Run CraterView.ai from a Python script, a TypeScript app or a ComfyUI workflow: install, add a key, run a first job, work through a folder and chain two tools.
CraterView.ai has three open-source clients. Each does the API’s upload, submit and wait for you, so a job is one call or one node:
- Python,
pip install craterview, for scripts, notebooks and back ends. - TypeScript,
npm install craterview, for Node and web back ends. - ComfyUI nodes, for building an image workflow on ComfyUI’s canvas without writing code.
Each repository’s README is the full reference. This guide is the walk-through: a first job, a folder of photos and two tools in a row. For the HTTP calls underneath, see your first API call.
A key, and what it costs
All three need an API key. Get one from your dashboard, under Developer API.
Making one costs nothing. Keep it out of your code and out of anything you share; the examples
here read it from the CV_API_KEY variable:
export CV_API_KEY="cv_..."
Without credit or a subscription, jobs run free on the community queue: the same models, with smaller size limits and longer waits at busy times. A photo straight off a phone can be past the community queue’s limit, so start with a small one. With credit or a subscription, jobs run on paid compute, which scales with demand. Each model’s price is on its feature page, and the code clients can quote a job without running it.
Python
pip install craterview
Python 3.9 or newer. run uploads the photo, starts the job, waits for it and hands it back:
import os
from craterview import CraterView

cv = CraterView(api_key=os.environ["CV_API_KEY"])

job = cv.run("photo.jpg", model="cv-enhance-v3", scale=2)
print(job.save("photo-2x"), job.credits, "credits", "(community)" if job.community else "")
save adds the result’s own extension and returns the path it wrote. While you write the code
around the call, model="echo" costs nothing and answers the way a paid model does.
Price it first. quote runs nothing and costs nothing. It answers with the credits the job
would cost, which queue it would run on and, for a scale, the result’s size:
print(cv.quote("cv-enhance-v3", {"scale": 2}, input_width=1500, input_height=1000))
A folder of photos. One job at a time is the simple way. A job that fails is not charged,
and its error_code is the part to branch on:
from pathlib import Path
from craterview import JobFailed

out = Path("enhanced")
out.mkdir(exist_ok=True)
for photo in sorted(Path("photos").glob("*.jpg")):
    try:
        job = cv.run(photo, model="cv-enhance-v3", scale=2)
    except JobFailed as failure:
        print(photo.name, "failed:", failure.error_code, failure)
        continue
    print(photo.name, "->", job.save(out / photo.stem), job.credits, "credits")
Two tools in a row. Give Enhance the original photograph, then send its result to the next
tool: run takes bytes as well as a path. Each step is a job of its own, charged as one.
enhanced = cv.run("old-print.jpg", model="cv-enhance-v3", scale=2)
restored = cv.run(enhanced.bytes(), model="cv-restore-v1")
restored.save("old-print-restored")
Enhance can return a far larger picture than Denoise or Restore takes, so keep its result within
the next model’s max_input_megapixels, listed by cv.models(), with a lower scale.
A job that outlasts the wait. run waits ten minutes by default (timeout). Past that only
the waiting stops: the job carries on and is charged if it succeeds. The error raised carries
.job_id, and cv.wait_for(error.job_id) collects the job. Calling run again would start a
second one. Retries, webhooks and every field of a job are in the
README.
TypeScript
npm install craterview
The package is TypeScript source, so run it with a tool that compiles TypeScript, such as tsx,
or bundle it first; plain Node cannot load it. Node 18 or newer. Keep your key on a server: a key
sent to a browser can be read by anyone who opens the page.
// npx tsx enhance.mts
import { readFile, writeFile } from "node:fs/promises";
import { CraterView } from "craterview";

const cv = new CraterView({ apiKey: process.env.CV_API_KEY });

const job = await cv.run(await readFile("photo.jpg"), { model: "cv-enhance-v3", scale: 2 });
const extension = (job.contentType ?? "image/jpeg").split("/")[1];
await writeFile(`photo-2x.${extension}`, new Uint8Array(await job.arrayBuffer()));
console.log(job.credits, "credits", job.community ? "(community)" : "");
The rest works as in Python. cv.quote(model, params, { inputWidth, inputHeight }) prices a
job. A failed job throws JobFailed, with errorCode to branch on. Two tools in a row is the
first result’s bytes into the second run:
const enhanced = await cv.run(await readFile("old-print.jpg"), { model: "cv-enhance-v3", scale: 2 });
const restored = await cv.run(await enhanced.arrayBuffer(), { model: "cv-restore-v1" });
The README has the rest, bundling included.
ComfyUI
The nodes put Enhance, Denoise, Restore, Small face enhancement and Headshot on ComfyUI’s canvas. The work runs on our servers, so ComfyUI needs no graphics card and no model files for them.
Install. In ComfyUI Manager (the Extensions button in current ComfyUI), search for CraterView.ai, install it and restart ComfyUI. Or, with comfy-cli:
comfy node install craterview
On a ComfyUI whose Manager has never fetched the node list, run comfy node update-cache first.
The key. Set CV_API_KEY where ComfyUI starts, or save the key in
ComfyUI/user/__craterview/api_key.txt, which needs no restart. Never type it into a node:
ComfyUI saves node inputs in every PNG it writes, which is why these nodes have no input for it.
A first workflow. Add Load Image, then CraterView.ai Enhance from the CraterView.ai category, then Save Image. Wire each image output to the next node’s image input and press Run.
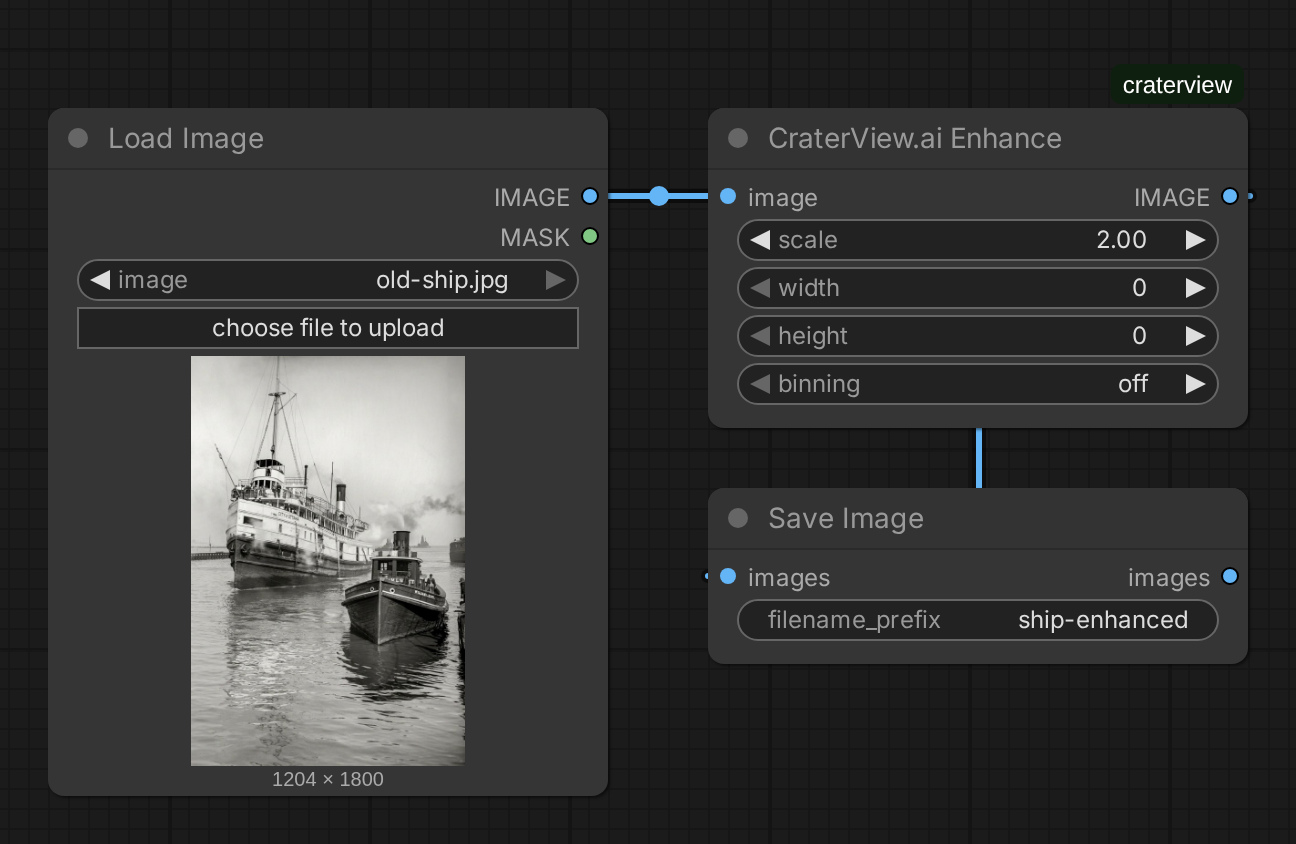
A setting left at its starting value is not sent, so the model’s own default applies. Enhance’s
scale, width and height are three ways to size the result: change one, since two at once
are refused. The tooltip on each setting says what it does.
Two tools in a row. Wire Enhance’s output into Denoise or Restore, with Enhance first on the original photograph. Keep Enhance’s result small enough for the next node, as in Python above.
Part of a picture. Crop it first with an image crop node, and send the crop.
Batches. Each image in a batch is a job of its own: a batch of 16 is 16 jobs, each priced as one.
Running again. With nothing changed, ComfyUI reuses the result and starts no job. Stop does not cancel a job that has started: it stops ComfyUI waiting, the job carries on, and it is charged if it succeeds.
When a node fails, its error says why, and View details has the whole message, including what to change. A photo over the community queue’s size limit is refused that way, with the size it can take.
The ComfyUI page and the README cover running ComfyUI in the cloud and the rest of how a node behaves.
Which one
Writing a program: Python or TypeScript, whichever your code is in. Building a workflow by hand, or mixing our tools with other ComfyUI nodes: the ComfyUI nodes. To ask for the work in words instead, connect an assistant or install the agent skills.
If something goes wrong, write to support@craterview.ai with the job’s id, which each client
reports, and we can look at that job.
Try it on your own file
No sign-up and no card — a workspace opens in your browser the moment you arrive.
Open Web AppMore guides

